Showing posts with label finished projects. Show all posts

Tuesday, January 17, 2012

Dining Table Project


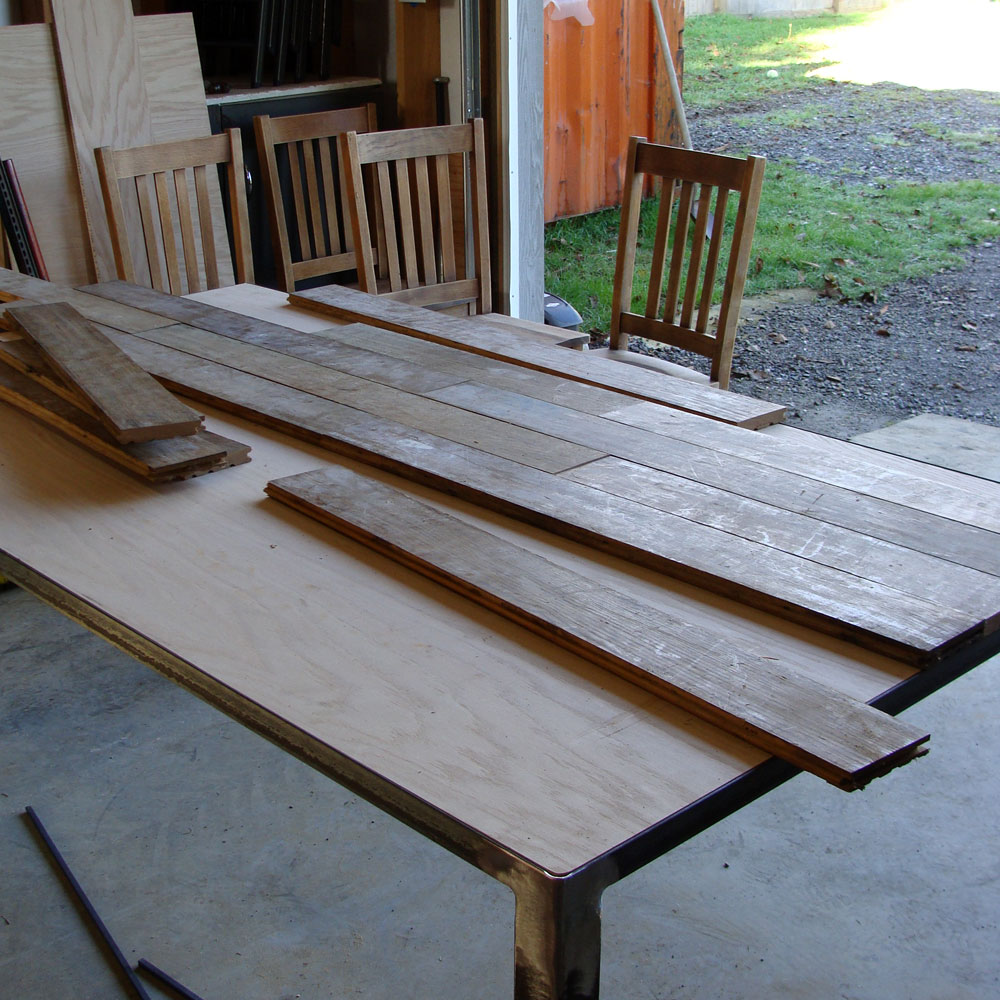
I have been yearning for a new dining room table and chairs for quite some time now. I had even found a table I loved on Etsy... but I am proud to say that rather than spend $3,000 on a new dinette set ($1,200 for the table plus eight chairs ~$200 each, and shipping, ouch!), Matt and I figured out a way to save a lot of money and still end up with something we love, with the added benefit of knowing we made it with our own four hands!

The idea began to form with a chance stop into a local shop called The Garden Gate in Arcata, CA. There was a table there with a similar design to what we ended up making (though I must say ours is way nicer!) - but anyways, it opened my mind to the possibility of a metal frame rather than an all-wood table. This was a critical distinction because Matt is an absolute whiz with metal fabrication (woodworking, not so much).

The next question was where the wood would come from. Ideally we hoped to find reclaimed material but we weren't sure where. We were incredibly fortunate that a family friend offered us as much wood as we wanted for free - he had somehow come into possession of a bunch of salvaged oak floor boards from a past renovation of San Francisco city hall and was happy to think about them going to good use after sitting in his barn for quite some time.


I happened to find a set of four chairs that I liked at a local used furniture store that was closing, so I got a great deal.


Matt set out to build the frame and I started sanding and staining chairs like a mad woman, and within two weeks of deciding what we wanted, here we are with a beautiful new table and chairs!


The table is large enough to seat eight. For normal day-to-day use I'll probably keep six chairs out - I'm thinking about adding two upholstered dining chairs (something simple like these or these perhaps?) - one on each end - and making covers for those two chairs out of laminated cotton so spills can easily be wiped off. One of those new chairs will be designated for Carlos - I don't want him messing up my pretty new wood chairs! :-) I'm having trouble deciding on the pattern for those two chairs though - I want something colorful but not garish - here are some that I like - which do you like?

(click to enlarge)

Wednesday, March 23, 2011

Tile, Part Two

First, here's a photo of the finished (grouted) living room tile. I love it so much! The living room feels like a normal room in a normal house now instead of like the corner of someone's garage with a few pieces of furniture thrown in (we've been living with bare cement floor since moving in last August - that nasty carpet had to go ASAP!) Now if only we could get those old windows replaced (the ones you can see on the left edge of the photo below)... it's always something, isn't it?


And finally, after hours and hours of hours of grueling work (mostly Matt's), this beautiful hearth has become a reality! We still need to get the stove pipe routed up through the ceiling but you can get the general idea -


That icky wall heater on the left will go away eventually; we haven't decided yet if we should keep it until we get a forced air system installed (which could be a few years down the road still) 0r rip it out to make the room prettier and live with wood heat only for the time being. I'm leaning towards ripping it out (it's just SO darn ugly!) but we'll see.

Monday, March 21, 2011

Progress

We have been working hard on so many projects here at the house these past few months (Matt more so than me), but nothing glamorous - french drains, tree removal, and the like - hence the lack of posts. Finally some exciting projects are coming together though, and while not 100% complete, I thought it would still be fun to share.

Matt has been toiling away with tile in the living room. We had originally planned to do wood floors in most of the living area of the house, but after researching sustainable wood options, we realized that we could save a lot of money by going with tile instead - partly because the per-square-foot cost was a lot less, but also because we can do the installation ourselves, which obviously saves a lot. Plus, tile should be a little more durable and scratch-resistant, which is important when you live with big dogs and active kids. And finally, we have been finding ourselves drawn more and more towards some Spanish influences in our decor, so the terra cotta tile fit right in.


Those little slivers of colorful Mexican tile you can see in the photos above are part of an amazing (if I do say so myself) wood stove hearth we've been working on (again, Matt more than me), but that deserves it's own post - soon.

I could write a book about our quest to find the perfect field tile for this project (it's not just for the living room and hearth; eventually it will also be installed in the kitchen, dining room, entryway, and hall), but the pared-down version of the story is this - it is damned hard to find a tile that looks like a saltillo (natural/terra cotta look), but has the durability of porcelain, isn't made in China by child slaves, and doesn't cost an arm and a leg. We spent months researching tile and scouring local stores and the internet for something that would meet our requirements, and finally, after much angst and frustration, found these tiles. They are called Super Saltillos and are made by Marazzi Tile. They are made in Texas and only cost around $2/square foot (plus shipping). Whew.

In case you need a reminder of what this room looked like less than a year ago, behold the hideousness -

UUUUUUUUUGGGGGGGHHHHHH.
(Much improved already, no?)

There's still a lot more in store for the living room - new windows, trim/baseboard, skylights, and improved lighting - but for now we're going to take a break from spending money on the house and direct all available resources to Matt's new shop, which is finally underway!


Tuesday, August 17, 2010

Finally a Finished Bathroom!

Okay, so we still need to do some touch-up painting and baseboard, but it's so close to done, I thought I'd share now. First, brace yourself for the 'before' picture. I'm warning you, it's not easy to look at...

((( shudder )))

But after months of hard work, and plenty of frustration along the way, we finally have a bathroom we love.

Eco-groovy cabinets (FSC certified birch with non-offgassing, non-urea-formaldehyde finishes) with Paperstone countertop (made from recycled paper!), Marmoleum flooring, super-efficient toilet, no-VOC paints... a green homeowner's paradise! :-)

The mirror frame is decorated with rocks that Matt, Carlos, and I collected from Agate Beach. I think it's my favorite part of the whole room.

Storage baskets made from recycled paper.

Shower surround also constructed from Paperstone.

Another shot of the mirror.

I'm kind of in awe of how much storage we were able to cram into this tiny space - tons of cabinets in the bathroom itself, plus we were even able to use an under-utilized corner of the bathroom to add a linen closet in the hallway just outside the bathroom door (though I forgot to photograph that).

Wednesday, August 11, 2010

A Sea Life Bed for Carlos

We really wanted to find a nice twin/full bunk bed for our son, Carlos' room at the new house. But I wasn't thrilled about spending $1,000 on a child's bed, and I couldn't find any eco-groovy twin/full beds even if I was willing to spend a lot. Thankfully, I have a very capable husband and he and I decided to build a bed instead. We found some plans on the internet for about $10 and constructed it from solid redwood. We ended up spending more than we hoped just on the materials (I think it was around $500), but at least we ended up with a sturdy bed that hopefully had less negative impact on the environment than a commercially made bed would have. (And I can say with 100% certainty that it wasn't made with child labor in China!) We used a low-VOC clear finish on the wood.


Carlos' current obsession is sea life, and it's an interest I'm happy to nurture in any way that I can. I decided to turn the bottom bunk of his bed into an undersea wonderland, and he and I are both thrilled with the results. :-)


The felt animals are from Etsy sellers ObeyMyBrain, jelene, and Heartfelt3, with a few more still on the way from LochNessMonsters. I made the bedspread from an old blue sheet, which I tie-dyed and added some sparkly fish appliques to. I found some ocean-y fabric for the backdrop and the ceiling, and made a few clumps of 'seaweed' from green and blue ribbon. The finishing touch is a strand of white LED lights, which you can't see too well in the photographs, but they look super cool at night. :-)

Bedroom in Progress

Well, we're all moved into the new house. There's still a lot to be done, with minor tweaks scheduled soon and major renovations/additions over the course of years, but it feels good to be here full time, and the place already looks so much better with the work we've put in so far, and with all of our own furniture and decor here, it's so much more homey and appealing.

I have a few updates to share - I'll start with our bedroom which I've posted about a few times already. I'm bound and determined to use this extremely bright blanket we bought in Guatemala last April as our bedspread, but it's driving me nuts - I'm having the hardest time matching anything to it - I don't want our bedroom to be day-glow neon colors, but I do like this blanket...

The blanket in question - I have a love/hate relationship with this thing.

Beautiful embroidered pillows, also from Guatemala.

I think I want to hang these above the bed - they are from a huge vintage wall calendar that I found at an estate sale a while back. They are one of the few things I've been able to find that incorporate some of the vibrant colors of the blanket without being overwhelmingly bright/garish.

More Guatemalan accents above my antique dresser - a hand-painted chicken mask and brightly colored table runner I bought in Antigua.

On the eco-friendly front, our dressers (which we've had for years) are antiques, our bed frame is made from maple grown and processed here in the Pacific Northwest, and our mattress is all-natural latex, free of the chemical flame retardants, plastics, vinyl, and petroleum-based foams often found in conventional mattresses.

Tuesday, July 20, 2010

Our Bedroom

The perfectionist in me wants to wait to post these until we get our furniture and other pretty things moved in, but the pragmatist in me says 'get over it!' :-) so without further ado, here's the first completed room in our new house!


It's hard to get a decent photo of the whole room since it's very tiny. But everything is new - texture, paint, flooring, trim, and window! And I love the way the colors all turned out - three walls are a nice neutral beige, there's one orangey accent wall, and that gorgeous deep red on the floor.

For the walls, we used eco-friendly no-VOC paint from Yolo Colorhouse. I love this company because they don't have hundreds and hundreds of colors - instead, the designer and artist owners hand-select a few dozen awesome colors that they are sure will look good in your house, and they provide lots of guidance and suggestions about what colors will complement other colors. It definitely made me feel more confident in my color choices.

We are not fans of wall-to-wall carpet - it's just not practical with pets and kids - so for the flooring, we went with Marmoleum, a brand of linoleum that is made from renewable, all natural ingredients - no funky plastics or off-gassy glues - yay!

This room will be ours until after the final phase of our remodel is complete, which could be a few years down the road, depending on finances. Eventually we'll have a bigger room and this one will either be a guest bedroom or a second child's bedroom.

Oh yeah, Otis wants to make sure you know he helped with the painting in this room!