Tuesday, January 17, 2012

Dining Table Project


I have been yearning for a new dining room table and chairs for quite some time now. I had even found a table I loved on Etsy... but I am proud to say that rather than spend $3,000 on a new dinette set ($1,200 for the table plus eight chairs ~$200 each, and shipping, ouch!), Matt and I figured out a way to save a lot of money and still end up with something we love, with the added benefit of knowing we made it with our own four hands!

The idea began to form with a chance stop into a local shop called The Garden Gate in Arcata, CA. There was a table there with a similar design to what we ended up making (though I must say ours is way nicer!) - but anyways, it opened my mind to the possibility of a metal frame rather than an all-wood table. This was a critical distinction because Matt is an absolute whiz with metal fabrication (woodworking, not so much).

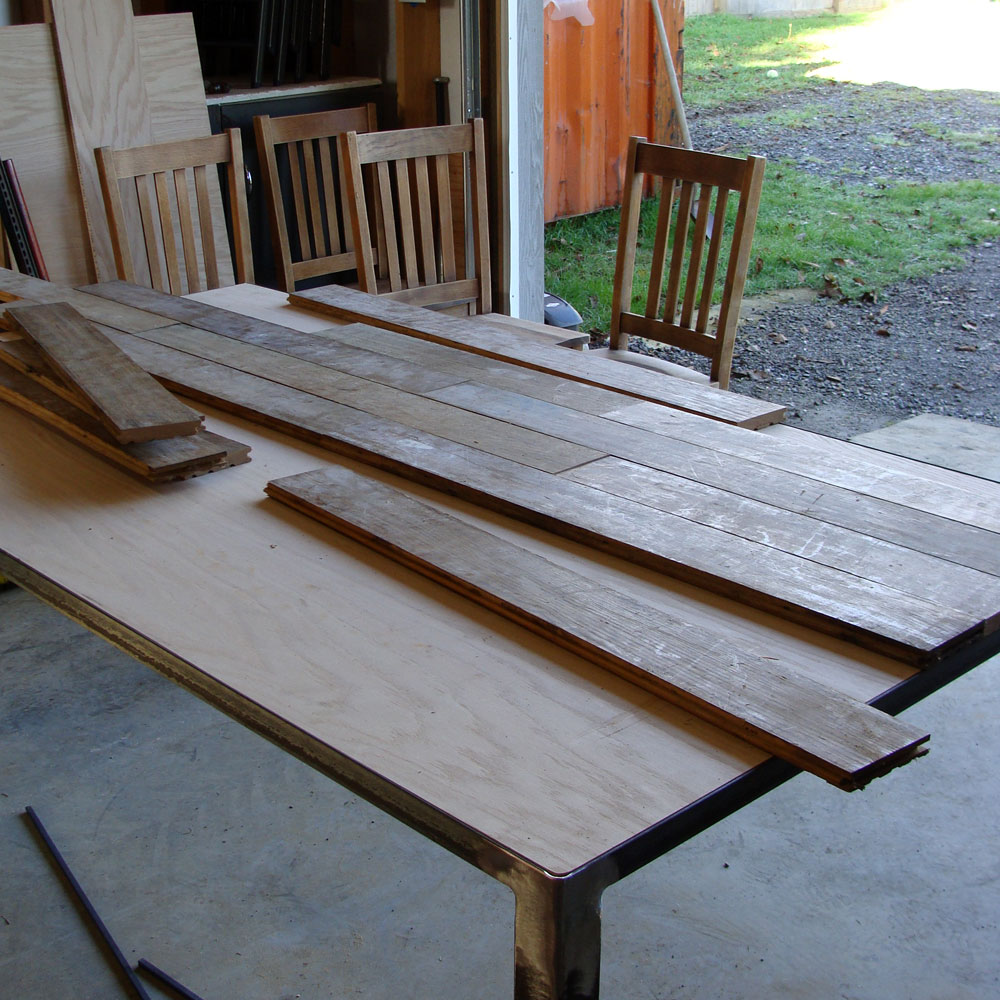
The next question was where the wood would come from. Ideally we hoped to find reclaimed material but we weren't sure where. We were incredibly fortunate that a family friend offered us as much wood as we wanted for free - he had somehow come into possession of a bunch of salvaged oak floor boards from a past renovation of San Francisco city hall and was happy to think about them going to good use after sitting in his barn for quite some time.


I happened to find a set of four chairs that I liked at a local used furniture store that was closing, so I got a great deal.


Matt set out to build the frame and I started sanding and staining chairs like a mad woman, and within two weeks of deciding what we wanted, here we are with a beautiful new table and chairs!


The table is large enough to seat eight. For normal day-to-day use I'll probably keep six chairs out - I'm thinking about adding two upholstered dining chairs (something simple like these or these perhaps?) - one on each end - and making covers for those two chairs out of laminated cotton so spills can easily be wiped off. One of those new chairs will be designated for Carlos - I don't want him messing up my pretty new wood chairs! :-) I'm having trouble deciding on the pattern for those two chairs though - I want something colorful but not garish - here are some that I like - which do you like?

(click to enlarge)

Friday, August 26, 2011

Gardening on the Cheap

Hmm... five months since my last post. I guess to tell you it's been a busy and stressful spring and summer would perhaps be unnecessary? :-) I do want to share some quick photos of this year's garden though.

We didn't have much available cash, but needed to section off part of the yard to prevent dogs from peeing on our plants. Our fence needed to be cheap and non-permanent, since the site of the garden this year will likely not be repeated (hopefully soon this spot is where my new studio will be built). I was dubious at first when Matt proposed a fence built of pallets, but as usual, he pulled it off.

Not the prettiest thing I've ever seen, but functional, and totally free. :-)

Zucchini in the front, tomato in the back

I didn't even think I could grow full-sized tomatoes in Humboldt without a greenhouse, but assuming these things actually ripen, we're going to have a ton of them - the plant is almost as tall as me, and it's tipped over it's tomato cage so many times, I gave up and just propped it up with garbage cans. Classy, right?

Cukes and more cukes

Pumpkin

Zucchini

Yellow squash

Dahlias

Last night I made vegan zucchini alfredo with zucchini and basil fresh from the garden, zucchini bread (more of our own zucchini), and apple crisp with apples from one of our trees. It was all yummy but I think I enjoyed looking at these even more than eating the food -


There's something so great about flowers straight from our own garden. Once we get more settled and our landscaping is more established, I can't wait to put in a bigger garden with berries and lots more flowers!

One problem we discovered is that our soil is apparently low in calcium. We had some problems with some of our zucchini rotting on the plant, and all of our fruit seems to be growing and ripening quite a bit more slowly than we expected. We have applied a calcium-rich fertilizer a few times and I think it's helped somewhat, but once we figure out where the permanent garden location will be, I guess we are supposed to mix some lime into the soil?

Wednesday, March 23, 2011

Tile, Part Two

First, here's a photo of the finished (grouted) living room tile. I love it so much! The living room feels like a normal room in a normal house now instead of like the corner of someone's garage with a few pieces of furniture thrown in (we've been living with bare cement floor since moving in last August - that nasty carpet had to go ASAP!) Now if only we could get those old windows replaced (the ones you can see on the left edge of the photo below)... it's always something, isn't it?


And finally, after hours and hours of hours of grueling work (mostly Matt's), this beautiful hearth has become a reality! We still need to get the stove pipe routed up through the ceiling but you can get the general idea -


That icky wall heater on the left will go away eventually; we haven't decided yet if we should keep it until we get a forced air system installed (which could be a few years down the road still) 0r rip it out to make the room prettier and live with wood heat only for the time being. I'm leaning towards ripping it out (it's just SO darn ugly!) but we'll see.

Monday, March 21, 2011

Progress

We have been working hard on so many projects here at the house these past few months (Matt more so than me), but nothing glamorous - french drains, tree removal, and the like - hence the lack of posts. Finally some exciting projects are coming together though, and while not 100% complete, I thought it would still be fun to share.

Matt has been toiling away with tile in the living room. We had originally planned to do wood floors in most of the living area of the house, but after researching sustainable wood options, we realized that we could save a lot of money by going with tile instead - partly because the per-square-foot cost was a lot less, but also because we can do the installation ourselves, which obviously saves a lot. Plus, tile should be a little more durable and scratch-resistant, which is important when you live with big dogs and active kids. And finally, we have been finding ourselves drawn more and more towards some Spanish influences in our decor, so the terra cotta tile fit right in.


Those little slivers of colorful Mexican tile you can see in the photos above are part of an amazing (if I do say so myself) wood stove hearth we've been working on (again, Matt more than me), but that deserves it's own post - soon.

I could write a book about our quest to find the perfect field tile for this project (it's not just for the living room and hearth; eventually it will also be installed in the kitchen, dining room, entryway, and hall), but the pared-down version of the story is this - it is damned hard to find a tile that looks like a saltillo (natural/terra cotta look), but has the durability of porcelain, isn't made in China by child slaves, and doesn't cost an arm and a leg. We spent months researching tile and scouring local stores and the internet for something that would meet our requirements, and finally, after much angst and frustration, found these tiles. They are called Super Saltillos and are made by Marazzi Tile. They are made in Texas and only cost around $2/square foot (plus shipping). Whew.

In case you need a reminder of what this room looked like less than a year ago, behold the hideousness -

UUUUUUUUUGGGGGGGHHHHHH.
(Much improved already, no?)

There's still a lot more in store for the living room - new windows, trim/baseboard, skylights, and improved lighting - but for now we're going to take a break from spending money on the house and direct all available resources to Matt's new shop, which is finally underway!


Tuesday, August 17, 2010

Finally a Finished Bathroom!

Okay, so we still need to do some touch-up painting and baseboard, but it's so close to done, I thought I'd share now. First, brace yourself for the 'before' picture. I'm warning you, it's not easy to look at...

((( shudder )))

But after months of hard work, and plenty of frustration along the way, we finally have a bathroom we love.

Eco-groovy cabinets (FSC certified birch with non-offgassing, non-urea-formaldehyde finishes) with Paperstone countertop (made from recycled paper!), Marmoleum flooring, super-efficient toilet, no-VOC paints... a green homeowner's paradise! :-)

The mirror frame is decorated with rocks that Matt, Carlos, and I collected from Agate Beach. I think it's my favorite part of the whole room.

Storage baskets made from recycled paper.

Shower surround also constructed from Paperstone.

Another shot of the mirror.

I'm kind of in awe of how much storage we were able to cram into this tiny space - tons of cabinets in the bathroom itself, plus we were even able to use an under-utilized corner of the bathroom to add a linen closet in the hallway just outside the bathroom door (though I forgot to photograph that).

Wednesday, August 11, 2010

It's the Chicken Taj Mahal

I cannot tell you how much time and energy we spent getting our property ready for our birds - probably more than on any other project! There was lots of fencing to be built, and lots of gates, and then of course the little barn itself... but it's finally done (well, okay, except for some custom feeders Matt's still building).

We were feeling overwhelmed so opted to have the basic structure pre-built, but we painted it ourselves and outfitted the inside with all kinds of perches, nesting boxes, storage, etc.

While I would have liked to go a 'greener' route for the barn's construction, I have to say that I would do it this way again in a heartbeat, given our time constraints and the need for the structure to be super secure. Duane at Capital City Sheds did an awesome job - he pre-cut all the materials, showed up at our house at 8:00 in the morning, assembled the shed, and was gone by 5:00 that same day. Pretty incredible to watch, and much faster than Matt or I could have done. Not too expensive either.

Here are some pics of its progression.


Here it is with some paint (same color as the house), and with the lower fence posts in.

Upper fence posts added...

Side enclosures going in...

Some salvaged windows and a couple of Wooly Pocket planters (made mostly from recycled plastic bottles, how cool is that?) complete the front of the barn.

We're still planning to add a little cement patio/landing in front of the big door, with a small planter on either side for home-grown greens for the birds.


The barn interior and the yard is divided into two sections - one for chickens and one for the ducks and turkeys. The duck/turkey side has lots of nice trees and such, but the lower yard for the chicken is in need of some enrichment - I'm planning on adding a few maple trees but don't want to put anything too close to the fence because I don't want them to use it to escape. Any other enrichment ideas besides trees?

Bye-bye from Rosa. :-)

Fruit Trees!

I am so excited to have so many mature fruit trees on our new property! They are all badly in need of pruning, but are still producing a ton of fruit.

Apples, apples, and more apples!

How do I know when they are ready to be picked? They are kind of small right now but a few have fallen to the ground already.

It looks like there are maybe five or ten different varieties of apples!

And the plums are beginning to be ripe enough to eat! Hooray!!!